

Do you find it annoying whenever you are asked to log into your account when you boot your computer? Did you wish this feature can just be disabled or bypassed so as to no longer be faced with the same screen? Lucky for you, there is a way around it.
You must be a previous or existing Windows 8 user to have come across this dilemma time and again with your computer for the first time. As it appears, this dilemma has persisted with the current Windows operating system, the Windows 10.
Although there is a very good reason why this feature is enabled by default in the first place, those who are confident enough that no one will touch their personal stuff are not too keen about it. To the contrary, they are annoyed with the imposition.
This problem poses a bigger issue in case the user has forgotten his password all of a sudden or had used a very long string of characters as his preferred password. For example, in the case when your computer or laptop has gone through an unexplainable shutdown or reboot, the problem does indeed arise.
Save yourself the headaches and frustration, there is actually a way to disable or bypass this rather unwanted feature of Windows.
A Simple Solution
First off, you would need a full access to your computer. This means that, by choosing to go through the procedure, you already have logged in to the computer you are using.
How to skip Windows 10 log-in automatically every boot up or reboot
Step 1: Click on the Start menu (the one with the Windows logo on the bottom-left corner of the screen) or simply press the Windows Key on your keyboard.
Step 2: Type on “netplwiz” on the search bar of the menu to find the best match to a “run command” which bears the name. While being highlighted, press the Enter key on your keyboard to run it.

Step 3: A new window should appear bearing the label “User Accounts.” In it is the list of existing users that have access to your computer. In the midst of it is a checkbox which contains the label stating, “Users must enter a username and password to use this computer.” This checkbox is checked by default. Intuitively, uncheck it.

Step 4: As a precaution of the real user’s authentication with the process, you will be prompted to enter the account’s password credential. This is also meant to safeguard one account from being modified by another user without permission. As such, enter the appropriate password for the account and click “OK” to confirm it.

Step 5: At this point, the login screen should already be disabled. However, to make sure that it indeed is working as intended, you would need to reboot your computer for it. So, if you have running apps or has an active workspace in the background during the procedure, save all your work and close them to proceed with the reboot.
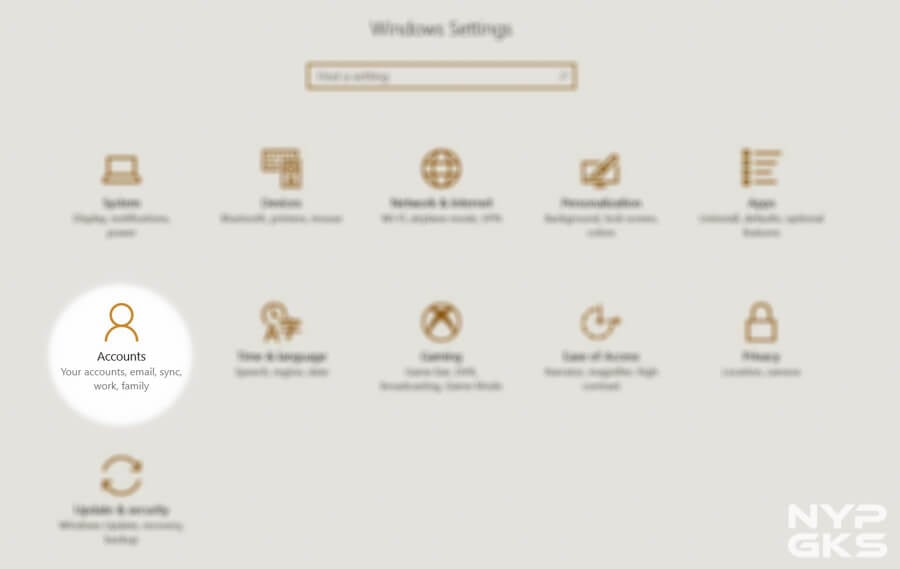
Step 6: Once you confirm that it’s working, make sure to disable the login whenever your Windows 10 computer wakes up from Sleep mode. Simply go to Settings -> Accounts -> Sign-In Options. In the “Require sign-in tab”, choose “Never”. You can check the screenshots below as a reference.


Safety considerations about removing or bypassing Windows 10 login
Having to disable your computer’s Windows 10 login screen is not without its risks. For one, it renders your computer literally accessible to just anyone, particularly in your absence. If you have a roommate, the risk is especially higher.
The same is also true if you work in a shared space where literally anyone can sneak on your computer without you noticing. This might sound like a stuff that happens only in movies, but really, they happen in real life as well.
At the worst-case scenario, anyone who managed to get ahold of your personal computer e.g. theft, will have easy access to its contents which might compromise your sensitive information such as credit card, tax returns, or business data.
Fortunately, direct physical access to your computer is the only problem you are to encounter when leaving it open for anyone by bypassing its login screen. Users who might try to access your computer remotely will have to be clever to figure out your username and password to gain access to it under the normal circumstances.
But to truly protect these sensitive data that you may be having on your personal computer, it is always wise to add a layer of protection to your files by encryption. The developers at Microsoft know how encryption is effective in keeping prying people from accessing important information digitally and hence its very implementation with the Windows OS. Otherwise, there is also some trusted third-party encrypting software out there that does a quality job of keeping your files secure.
Nice article but title wasn’t accurate, you weren’t bypassing Windows 10 login nor signing-in without a password because you’ve already given your credentials and instructed Windows 10 to log you in automatically.
Your article should have been titled “How to automatically log into Windows 10 without typing your password each time it boots up”
or the same one you used in the solution “How to skip Windows 10 log-in automatically every boot up or reboot” which is more accurate than the title itself.
Nevertheless, good read. Keep it coming.
Hi, Chapz! I wrote the title that way because it’s how people usually type their queries on Google when they search for this kind of tutorial. Thank you very much for the feedback and support. We really appreciate it. :-)